 After reading the title of this article you may be thinking of small neighborhoods in the world’s most-connected cities where BGP-minded people live together, or maybe online places where BGP connoisseurs hang out, such as the North American Network Operators Group (NANOG) mailinglist. But what I want to talk about today is the BGP communities attribute. In 1996, a few years after the BGP-4 specification was published, RFC 1997 added the communities attribute to BGP.
What are BGP Communities?
Communities are basically labels that are attached to BGP routes. A few of these labels have pre-defined meanings. The well-known communities are:
- NO_EXPORT (0xFFFFFF01)
- NO_ADVERTISE (0xFFFFFF02)
- NO_EXPORT_SUBCONFED (0xFFFFFF03)
- NOPEER (0xFFFFFF04)
The NO_EXPORT community tells a router it should only propagate any prefixes this BGP community is attached to over iBGP, and not propagate it over eBGP to external autonomous systems. (NO_EXPORT_SUBCONFED does something similar in networks using confederations to limit the number of iBGP sessions.) NO_ADVERTISE goes a step further and tells the router to not advertise the prefix over BGP at all. Most, if not all, routers automatically honor these communities when they’re present. So if you want to overrule this behavior, you need to filter them out. NOPEER was defined later and indicates that a prefix “need not” be advertised over peering relationships.
User-defined BGP Communities
User-defined BGP Communities are custom values set by network operators to achieve specific routing policies. These are not predefined by any standards body but are instead agreed upon within a network or between collaborating networks. By tagging routes with specific community values, operators can control route propagation, apply customized policies, and manage traffic flow efficiently.
Many routers don’t automatically propagate communities. On a Cisco router, you’ll have to enable this explicitly for a BGP neighbor with the “send-community” keyword:
router bgp 9000
neighbor 10.0.0.1 remote-as 10000
neighbor 10.0.0.1 send-community
!
ip bgp-community new-format
!
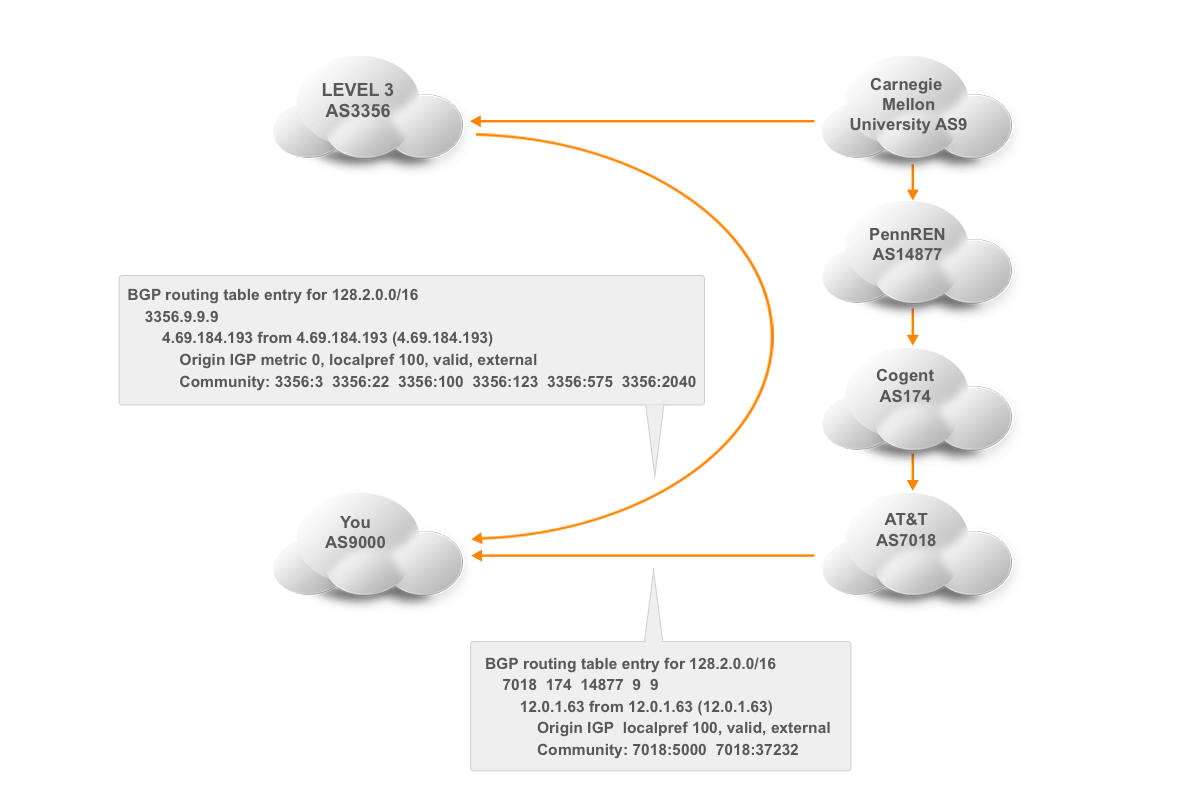
Communities are 32-bit values. By default, they show up as decimal numbers that can get pretty unwieldy. The “ip bgp-community new-format” line changes the display format of communities into two 16-bit values separated by a colon. (The well-known communities show up as “no-export” for NO_EXPORT et cetera.) The first 16-bit number is normally the AS number of the network that sets the community or looks for it, and the second number is one that conveys the intended information. For instance, Level3 (AS3356) tags all the prefixes it learns in Pittsburgh with community 3356:2040.

BGP Communities Use Cases
If you had a reason to avoid paths that go through Level3’s network in Pittsburgh, you could look for 3356:2040 and give prefixes that have this community applied to them a lower local preference. That way, if your router has additional paths towards the prefix in question, it’ll use one of the alternatives. The following configuration accomplishes this:
router bgp 9000
neighbor 10.0.0.2 remote-as 3356
neighbor 10.0.0.2 route-map peer2 in
!
ip community-list 80 permit 3356:2040
!
route-map peer2 permit 10
match community 80
set local-preference 80
!
route-map peer2 permit 20
!
The first thing that we do is apply route map peer2 to inbound updates from neighbor 10.0.0.2. This route map has two clauses: the permit 10 and the permit 20 part. 10 and 20 are basically line numbers, which allow you to (for example) add a clause 15 if you need to fit in something between 10 and 20. The permit 10 clause refers to the community access list 80, which permits all prefixes that are labeled with community 3356:2040. So if that community is present, the “match” part of the permit 10 clause is fulfilled, so the “set” part is executed, and the local preference for the prefix in question is set to 80. (Which is lower, and thus less preferred, than the default value of 100.) At this point, the matching prefix is added to the BGP table and no further processing is done for that prefix.
However, prefixes that don’t have community 3356:2040 and thus don’t match community list 80 pass through the permit 10 clause without any action. The permit 20 clause then catches them, because without a “match” statement, all prefixes match. Then, no action is performed, but because of the implicit match, the prefixes that get this far are added to the BGP table. Without the permit 20 clause, any prefixes not matched by the permit 10 clause would be filtered out because of Cisco’s implicit deny system: everything that isn’t explicitly allowed by the time we reach the end of a filter or route map is denied (and filtered out).
Now maybe avoiding paths through Level3’s Pittsburgh point-of-presence is not high on your list of priorities. However, there are many more things that can be accomplished with communities. Many large networks publish a list of communities that they set and honor, often in the routing registries. Like Level3 in the RIPE database. (If you’re interested in observing some communities in the wild, log into route-views.routeviews.org with telnet and type something like “show ip bgp 24.56.100.0”.)
Let’s discuss one more use of communities: setting up an active/standby scenario. Normally, if you have two connections to the internet, both of those will be used for both incoming and outgoing traffic. However, under some circumstances, it can be beneficial to have one connection handle all traffic and have the second one be just a backup that remains idle until the primary connection fails. For outgoing traffic, this is easy enough: lower the local preference for all prefixes learned over the backup line. However, for incoming traffic, the local preference needs to be lowered in the neighboring AS. Turns out, Level3 has three communities that do exactly that:
- 3356:70 – set local preference to 70
- 3356:80 – set local preference to 80
- 3356:90 – set local preference to 90
Unfortunately, there is no information on the local preference values Level3 uses for customer routes and peer routes. The former are always higher than the latter, and we’ll assume that peer routes normally have a local preference of over 70, so if we set our prefixes to 70, those prefixes have a preference lower than peer routes, so Level3 will actually prefer to reach us through our other ISP over a peer route rather than directly over our backup line. This is the configuration that accomplishes this:
router bgp 9000
neighbor 10.0.0.1 remote-as 10000
neighbor 10.0.0.1 description Primary ISP
neighbor 10.0.0.2 remote-as 3356
neighbor 10.0.0.2 description Backup ISP
neighbor 10.0.0.2 send-community
neighbor 10.0.0.2 route-map peer2-in in
neighbor 10.0.0.2 route-map peer2-out out
!
route-map peer2-in permit 10
set local-preference 70
!
route-map peer2-out permit 10
set community 3356:70
!
We don’t apply any special settings to the BGP sessions towards the primary ISP, so the local preference learned over that BGP session will be 100. On the session to Level3, the backup ISP, we apply two route maps: one for incoming updates and one for outgoing updates. The peer2-in route map sets the local preference for all prefixes learned from Level3 to 70. So when given the choice, the router will send outgoing traffic through the primary ISP. Only when a destination is reachable through Level3 but not through the primary ISP will the traffic be sent over the backup link.
The peer2-out route map sets the community 3356:70 on the prefixes we send to Level3, which will make Level3’s routers lower the local preference within the Level3 network to 70 for those prefixes, so the backup configuration also applies to incoming traffic.
Verifying the Effectiveness of BGP Community Configurations
Ensuring that your BGP community configurations are working as intended is crucial for maintaining a stable and efficient network. Here are several methods and best practices for verifying the effectiveness of these configurations:
1. Monitor Routing Tables
Commands:
- On Cisco devices:
show ip bgp - On Juniper devices:
show route table inet.0 extensive
These commands display the BGP routing table, which you can examine to verify that routes have the expected community tags and preferences.
2. Check Community Propagation
Ensure that communities are being propagated to and from your BGP peers correctly. Use commands like:
show ip bgp communityon Ciscoshow bgp communityon Juniper
These commands help verify that the community attributes are present on the routes as expected.
3. Route Maps and Policies
Review the applied route maps and policies to ensure they are functioning correctly. Check the configurations and use commands to see their effects:
- Cisco:
show route-map - Juniper:
show configuration policy-options
Ensure that the route maps and policies match the correct routes and apply the intended actions based on community values.
4. Traffic Analysis
Analyze the traffic flow to confirm that routing decisions are being influenced as intended by the community configurations. Tools like the Noction Flow Analyzer can provide insights into traffic patterns and volumes.
5. Simulation and Testing
Use network simulation tools (e.g., GNS3, Cisco VIRL, or EVE-NG) to test your BGP community configurations in a controlled environment before deploying them in the production network. This helps identify potential issues and understand the impact of the configurations.
6. Route Filtering and Policy Application
Verify that routes are being filtered and preferred correctly by checking the routing policies applied on BGP sessions:
- Ensure that unwanted routes are filtered out and preferred routes are accepted.
- Use commands like
show ip bgp neighbor <neighbor_ip> received-routesandshow ip bgp neighbor <neighbor_ip> advertised-routesto see the routes exchanged with neighbors.
7. External Verification Tools
Leverage external tools and services to verify the visibility and propagation of your routes and communities on the global internet:
- RouteViews: Access routeviews.routeviews.org to see how your routes appear from different parts of the internet.
- RIPE RIS: Use RIPE Routing Information Service to analyze BGP data from various locations.
8. Logging and Alerts
Set up logging and alerts to monitor changes and anomalies in BGP routes and communities. Logs can help track changes over time and identify issues quickly.
- Enable BGP logging on routers to capture events related to BGP route updates and community changes.
- Use network monitoring tools to set up alerts for unexpected changes in routing behavior.
9. Periodic Audits
Conduct regular audits of your BGP configurations and routing policies to ensure they are up to date and functioning as intended. This includes:
- Reviewing BGP community usage and their impact on routing decisions.
- Ensuring documentation is current and reflects the actual network state.
10. Peer Feedback
Engage with your BGP peers to gather feedback on how your routes are being received and processed. This can help identify any discrepancies or issues that might not be visible from your end.
Have a look at various communities that ISPs make available, such as the blackhole community, which can be useful if there’s a denial of service attack towards some of your addresses. By having those addresses blackholed through the use of a blackhole community, at least the rest of your network will remain reachable. There are also communities for selectively applying AS path prepending, which can help with traffic engineering. Nevertheless, pay attention to The dark side of BGP community attributes as well.